
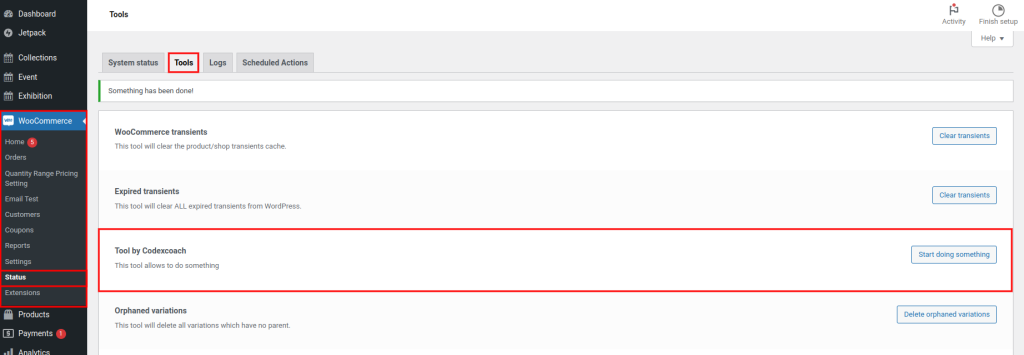
The simplest method to provide such capability is to build a tool in WooCommerce > Status > Tools.
<?php
add_filter( 'woocommerce_debug_tools', 'cxc_woocommerce_status_tool' );
function cxc_woocommerce_status_tool( $tools ) {

	$new_tool = array(
		'cxctool' => array(
			'name'     => 'Tool by Codexcoach',
			'button'   => 'Start doing something',
			'desc'     => 'This tool allows to do something',
			'callback' => 'cxc_do_something_callback',
			'disabled' => false,
		),
	);

	$tools = array_slice( $tools, 0, 2, true ) + $new_tool + array_slice( $tools, 2, NULL, true );

	return $tools;

}
?>
Callback functions
<?php
// callback functions
function cxc_do_something_callback() {

	return 'Something has been done!';

}
?>- As you can see, I used the array_slice() PHP method to display the tool first (after “Expired Transients” in our instance). By default, the custom tool appears at the very bottom, just after “Regenerate the product attributes lookup table.” In our situation, just substitute number 2 with the location number where you want your tool to appear.
- When the disabled parameter on line 11 is set to true, your tool will be shown at the smallest possible size but with an unclickable (disabled) button.
- cxc_do_something_callback() is a function that does everything. You may send it as an array array($this, ‘do_something’) if you’re within a class.
- Another hook, woocommerce_system_status_tool_executed, is called when the tool has completed its task.
Was this article helpful?
YesNo