
It is typically wise to apply some data validation when including forms for user input on your website. This not only guarantees that your application receives the right kind of data, but also improves user experience (UX) because users will be alerted to improper input and provided suggestions for the right kind of data.
Client-side validation and server-side validation are the two types of validation. It is advised that you carry out both. JavaScript is typically used for client side validation, which aims to provide the user with immediate feedback on input problems prior to sending the data to the server. A second line of defence against inaccurate data is server side validation. Even if you have client side validation set up, server side validation should always be used because JavaScript can be disregarded.
In this lesson, we’ll look at utilising jQuery to perform client-side validation. We’ll look at two methods for doing this. In the first example, we’ll validate a form’s data by writing the validation rules from scratch, and in the second, we’ll demonstrate how the jQuery Validation Plugin may make this process simpler.
1) validate a form’s data by writing
Include jQuery in your HTML file to get going.
<script src="https://cdnjs.cloudflare.com/ajax/libs/jquery/3.6.3/jquery.min.js"></script>Add the following form to the file.
<!-- Cxc First Form -->
<h2> Cxc Example 1: </h2>
<form id="cxc_first_form" class="cxc_first_form" method="post" action="">
<div class="cxc-append-error"></div>
<div>
<label for="cxc_first_name">First Name:</label>
<input type="text" id="cxc_first_name" class="cxc_first_name" name="cxc_first_name"></input>
</div>
<div>
<label for="cxc_last_name">Last Name:</label>
<input type="text" id="cxc_last_name" class="cxc_last_name" name="cxc_last_name"></input>
</div>
<div>
<label for="cxc_email">Email:</label>
<input type="email" id="cxc_email" class="cxc_email" name="cxc_email"></input>
</div>
<div>
<label for="cxc_company_name">Company Name:</label>
<input type="text" id="cxc_company_name" class="cxc_company_name" name="cxc_company_name"></input>
</div>
<div>
<label for="cxc_password">Password:</label>
<input type="password" id="cxc_password" class="cxc_password" name="cxc_password"></input>
</div>
<div>
<input type="submit" value="Submit" />
</div>
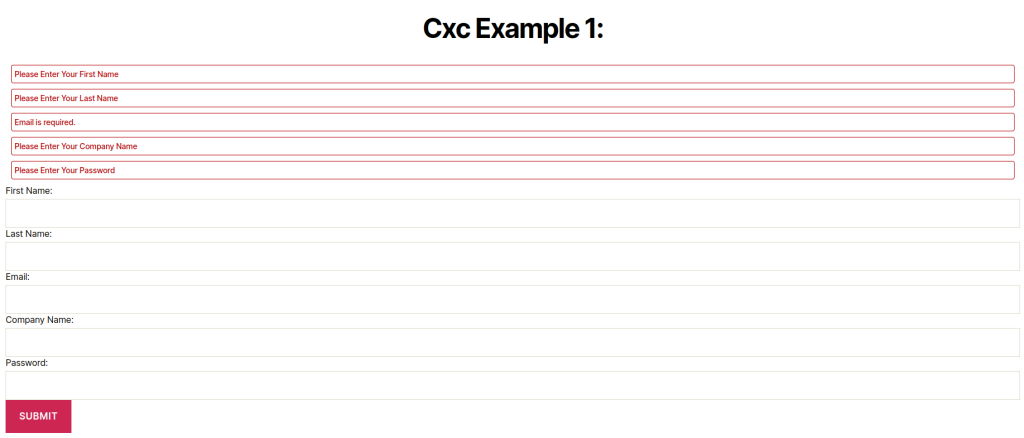
</form>A simple form with five fields and a submit button is represented by the markup above.
Add the CSS styles.css file shown below.
	<style type="text/css">
		.cxc-error { color: #b30202; font-size: 14px; font-weight: 500; padding: 5px; width: calc(100% - 20px); margin: 0 auto 10px;border-radius: 4px; border: 1px solid #b30202; }
	</style>
Add the following JavaScript code to the file.
<script type="text/javascript">
		jQuery(document).ready(function() {

			jQuery(document).on( 'submit', '.cxc_first_form', function(e) {
				e.preventDefault();
				var cxc_first_name = jQuery('.cxc_first_name').val();
				var cxc_last_name = jQuery('.cxc_last_name').val();
				var cxc_email = jQuery('.cxc_email').val();
				var cxc_company_name = jQuery('.cxc_company_name').val();
				var cxc_password = jQuery('.cxc_password').val();

				cxc_first_name = cxc_first_name.trim();
				cxc_last_name = cxc_last_name.trim();
				cxc_email = cxc_email.trim();
				cxc_password = cxc_password.trim();

				var cxc_error = '';
				var cxc_flag = 0;
				jQuery('form.cxc_first_form .cxc-error').remove();

				if( cxc_first_name == '' ){
					cxc_error += '<p class="cxc-error">Please Enter Your First Name</p>';
					cxc_flag = 1;
				}

				if( cxc_last_name == '' ){
					cxc_error += '<p class="cxc-error">Please Enter Your Last Name</p>';
					cxc_flag = 1;
				}

				if( cxc_email == '' ){
					cxc_error += '<p class="cxc-error">Email is required.</p>';
					cxc_flag = 1;
				} else if( !IsEmail( cxc_email ) ){
					cxc_error += '<p class="cxc-error">Email is not valid.</p>';
					cxc_flag = 1;
				}

				if( cxc_company_name == '' ){
					cxc_error += '<p class="cxc-error">Please Enter Your Company Name</p>';
					cxc_flag = 1;
				}

				if( cxc_password == '' ){
					cxc_error += '<p class="cxc-error">Please Enter Your Password</p>';
					cxc_flag = 1;
				}

				jQuery('form.cxc_first_form .cxc-append-error').append( cxc_error );

			});

		});

		function IsEmail( email ){
			var regex = /^([a-zA-Z0-9_\.\-\+])+\@(([a-zA-Z0-9\-])+\.)+([a-zA-Z0-9]{2,4})+$/;
			if( !regex.test( email ) ) {
				return false;
			} else {
				return true;
			}
		}

	</script>
2) Validation using inbuilt jQuery validation plugin
In the previous example, we wrote code that validated the forms data from scratch. To make this process faster and easier, you can use a library like the jQuery Validation Plugin. With this, you only have to specify a few rules for each field of your form that is to be validated, and the plugin will take care of validation for you.
To see this in action, first include the library in your file. Don’t remove the jQuery script tag as the plugin depends on jQuery.
<script src="https://cdnjs.cloudflare.com/ajax/libs/jquery/3.6.3/jquery.min.js"></script>
<script src="https://cdn.jsdelivr.net/jquery.validation/1.16.0/jquery.validate.min.js"></script>
Add the following form to the file.
<!-- Cxc Secound Form -->
<h2>Cxc Example 2:</h2>
<form class="cxc_secound_form" id="cxc_secound_form" method="post" action="">
<div>
<label for="cxc_first_name">Firstname</label>
<input type="text" id="cxc_first_name" class="cxc_first_name" name="cxc_first_name"></input>
</div>
<div>
<label for="cxc_last_name">Lastname</label>
<input type="text" id="cxc_last_name" class="cxc_last_name" name="cxc_last_name"></input>
</div>
<div>
<label for="cxc_email">Email</label>
<input type="email" id="cxc_email" class="cxc_email" name="cxc_email"></input>
</div>
<div>
<label for="cxc_company_name">Company Name</label>
<input type="text" id="cxc_company_name" name="cxc_company_name"></input>
</div>
<div>
<label for="cxc_password">Password</label>
<input type="password" id="cxc_password" class="cxc_password" name="cxc_password" ></input>
</div>
<div>
<input type="submit" value="submit">
</div>
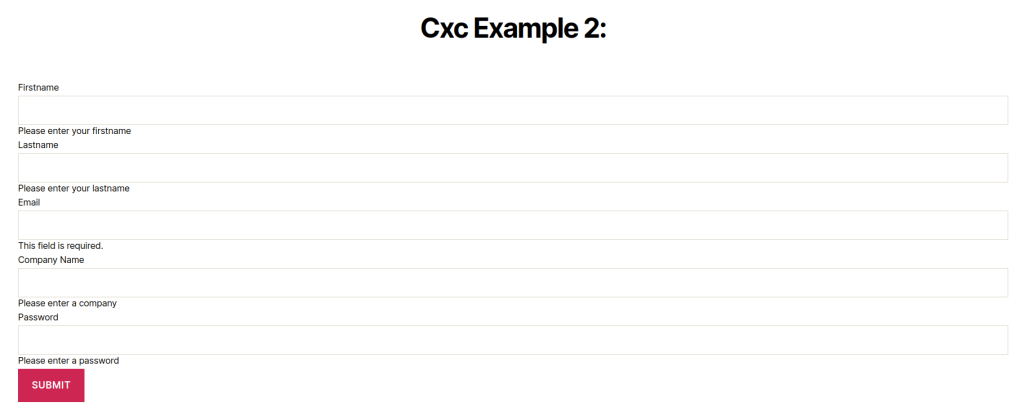
</form>Add the following JavaScript code to the file.
	<script>
		jQuery(document).ready(function() {

			jQuery(".cxc_secound_form").validate({
				rules: {
					cxc_first_name: "required",
					cxc_last_name: "required",
					cxc_email: {
						required: true,
						email: true
					},
					cxc_company_name: {
						required: true,
						minlength: 2
					},
					cxc_password: {
						required: true,
						minlength: 5
					},
				},
				messages: {
					cxc_first_name: " Please enter your firstname",
					cxc_last_name: " Please enter your lastname",
					cxc_company_name: {
						required: " Please enter a company",
						minlength: " Your company must consist of at least 2 characters"
					},
					cxc_password: {
						required: " Please enter a password",
						minlength: " Your password must be consist of at least 5 characters"
					},
				}
			});
		});

	</script>