When working with WooCommerce, you can add more information to your product page by adding custom fields to the goods. These custom fields, often known as item meta, can be shown on the cart page, checkout page, and emails.
Cart item meta is when additional product fields are added to the cart’s products. When that information is saved for the order, it is referred to as “order item meta.”
To add custom fields to woocommerce, use the following code in your current theme’s functions.php file:
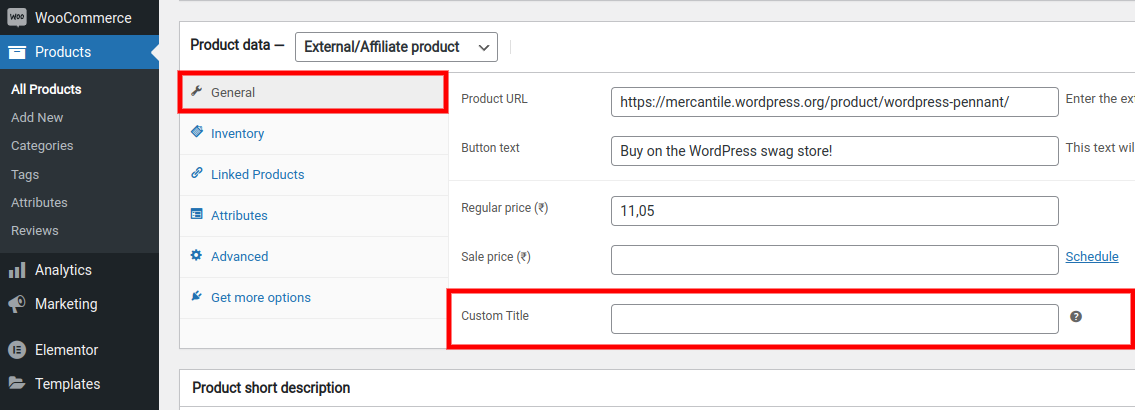
Create a custom field in the general product data
<?php
//Add custom field in general
add_action( 'woocommerce_product_options_general_product_data', 'cxc_woocommerce_product_custom_field' );

function cxc_woocommerce_product_custom_field() {
	$args = array(
		'id' => 'custom_title',
		'label' => __( 'Custom Title', 'cxc-codexcoach' ),
		'class' => 'wc-custom-field',
		'desc_tip' => true,
		'description' => __( 'Enter the title of your custom text field.', 'cxc-codexcoach' ),
	);
	woocommerce_wp_text_input( $args );
}
?>- The code starts by defining a function called cxc_woocommerce_product_custom_field() which is used to create custom fields.
- The first argument of the function is id, which defines the ID of the field that will be created.
- The second argument is a label, which defines what text should appear on the input for this field.
Saves the custom field in the general product data
<?php
//Save custom field
add_action( 'woocommerce_process_product_meta', 'cxc_save_custom_field' );

function cxc_save_custom_field( $post_id ) {
	$custom_title = isset($_POST['custom_title']) ? $_POST['custom_title'] : '';
	update_post_meta( $post_id, 'custom_title', $custom_title );
}
?>
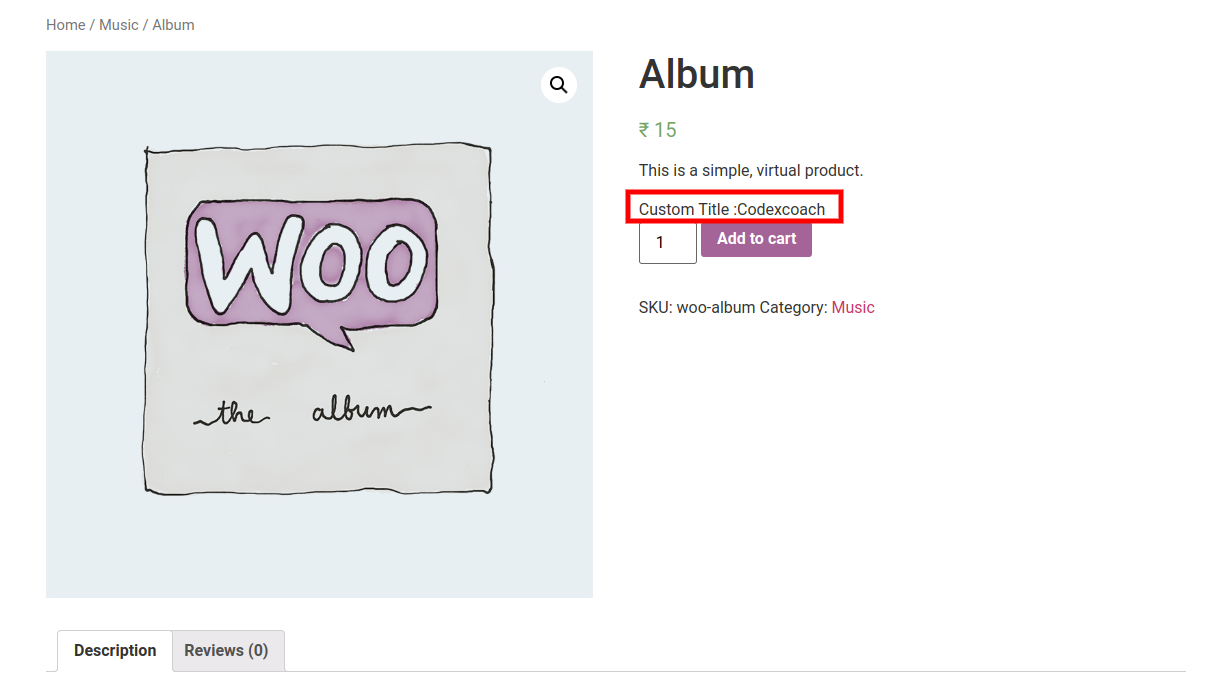
Display a custom field on the product page
<?php
//Add custom field in product page
add_action( 'woocommerce_before_add_to_cart_button', 'cxc_display_custom_field' );

function cxc_display_custom_field() {
	global $product;
	$product_id = $product->get_id();
	$custom_title = get_post_meta( $product_id, 'custom_title', true );
	if( $custom_title ) {
		echo '<div class="custom-title-wrapper"><label for="wc-title">Custom Title : </label>'.$custom_title.'</div>';
	}
}
?>- The code starts by adding a function called cxc_display_custom_field() that is triggered when the “Add to Cart” button is clicked.
- The function starts by getting the product ID from the current product and then gets the custom title field value for this particular product.
- If there is one, it will be displayed in a div with class=”custom-title-wrapper”.
- The code also has an action hook called woocommerce_before_add_to_cart_button which is hooked in so that any time before adding to a cart, we can display our custom fields on the screen.

Adds a custom field to the cart item data
<?php
//Add custom field in cart item data
add_filter( 'woocommerce_add_cart_item_data', 'cxc_store_custom_field', 99, 3 );

function cxc_store_custom_field( $cart_item_data, $product_id, $variation_id ) {
	$custom_title = get_post_meta( $product_id , 'custom_title', true );

	if( !empty( $custom_title ) ) {
		$cart_item_data[ 'custom_title' ] = $custom_title;
	}

	return $cart_item_data;
}
?>- The code begins by adding a filter to the woocommerce_add_cart_item_data function.
- This filter is called cxc_store_custom_field and it takes three parameters: $cart item data, product ID, and variation ID.
- The first parameter is an array of all the cart items that are currently in the shopping cart.
- The second parameter is a product ID number which uniquely identifies one specific product within your store’s inventory.
- The third parameter is a variation ID number which uniquely identifies one specific variation within your store’s inventory for this particular product (for example, if you have two different sizes of shirts available).
Custom field to the cart item data, and then display that custom field on the checkout page
<?php
//get custom field in cart item data
add_filter( 'woocommerce_get_item_data', 'cxc_display_meta_field_on_cart_and_checkout', 10, 2 );

function cxc_display_meta_field_on_cart_and_checkout( $cart_data, $cart_item ) {

	if( isset( $cart_item['custom_title'] ) ) {
		$cart_data[] = array(
			'key' => __( 'Custom Title', 'cxc-codexcoach' ),
			'value' => $cart_item['custom_title']
		);
	}
	return $cart_data;
}
?>- The code starts by checking if the custom_title field is set.
- If it is, then a new array called key and value are created with the key being __( ‘Custom Title’, ‘cxc-codexcoach’ ) and the value being $cart_item[‘custom_title’] .
- The return statement returns an updated version of cart data that has been altered to include this new information.
- The code starts by checking if the custom_title field is set.
- If it is, then a new array called key and value are created with the key being __( ‘Custom Title’, ‘cxc-codexcoach’ ) and the value being $cart_item[‘custom_title’] .
- The return statement returns an updated version of cart data that has been altered to include this new information.
Saves the custom field in order of item data
<?php
//save custom field in order item data
add_action( 'woocommerce_checkout_create_order_line_item', 'cxc_save_meta_field_on_cart_and_checkout', 10, 4 );

function cxc_save_meta_field_on_cart_and_checkout( $item, $cart_item_key, $values, $order ) {
	if( isset( $values['custom_title'] ) ) {
		$item->add_meta_data(
			__( 'Custom Title', 'cxc-codexcoach' ),
			$values['custom_title'],
			true
		);
	}
}
?>- The code is trying to save the custom field in order of item data.
- The function is called “cxc_save_meta_field_on_cart_and and checkout”.
- It takes three parameters: $item, $cart_item key, and $values.
- The first parameter is the current order item that we are saving the meta-data.
- The second parameter is a string of characters that uniquely identifies this particular cart item.
- The third parameter contains all of the values associated with this particular cart item.
Hopefully, you were able to follow along with me as I demonstrated how to create, add, and save custom field data in WooCommerce.


Thanks for one’s marvelous posting! I quite enjoyed reading it, you might
be a great author.I will be sure to bookmark your
blog and definitely will come back in the foreseeable future.
I want to encourage you to continue your great job, have a nice weekend!
Hi colleagues, how is all, and what you desire to say regarding this paragraph, in my
view its truly awesome in support of me.